Options range from a battery or plug-in LED strip you can stick up in a weekend to a full wall of floor-to-ceiling cabinets, so the choice comes down to how much floor and wall your room has to give.
If space is tight, start with what folds away, like a foldable clothes airer, and save the floor-to-ceiling cabinets for when the layout allows.
1. Overhead Lights and Task Lighting
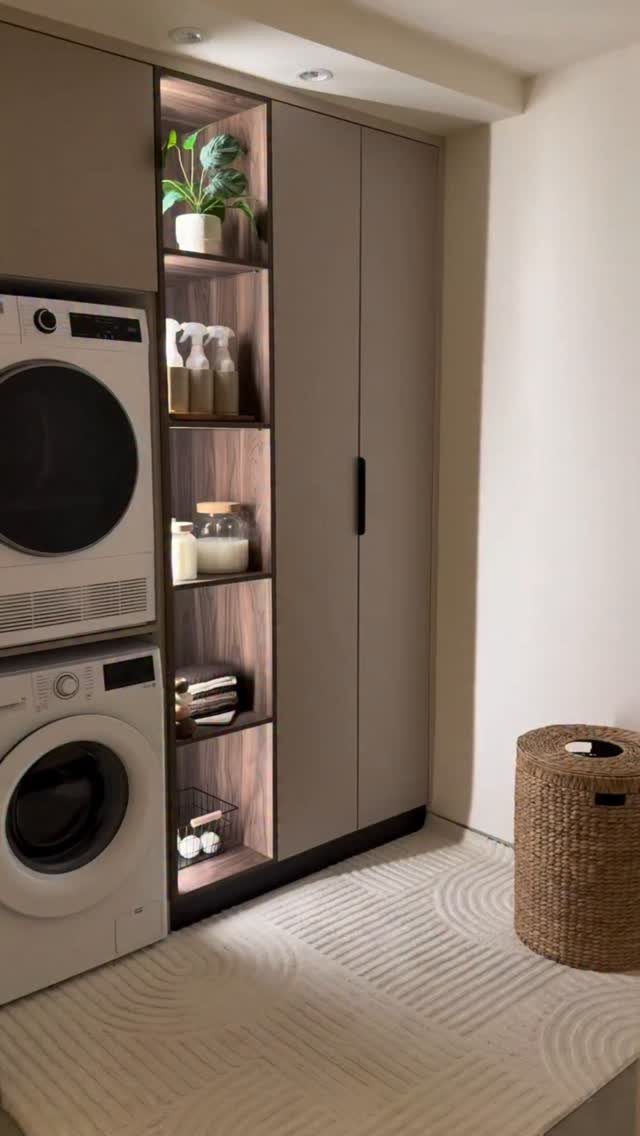
A shelving unit with built-in LED strips solves a problem overhead lights can’t: the shadow your own body casts when you lean into a cabinet. Light that sits on the shelves shows detergent labels and stain-treater caps without any hunting.
In a stacked washer and dryer setup, I’d still keep a ceiling fixture for general brightness and let the shelf lighting handle the close work. Battery or plug-in LED strips are the budget route for a weekend.
2. Light Shades with Darker Accents
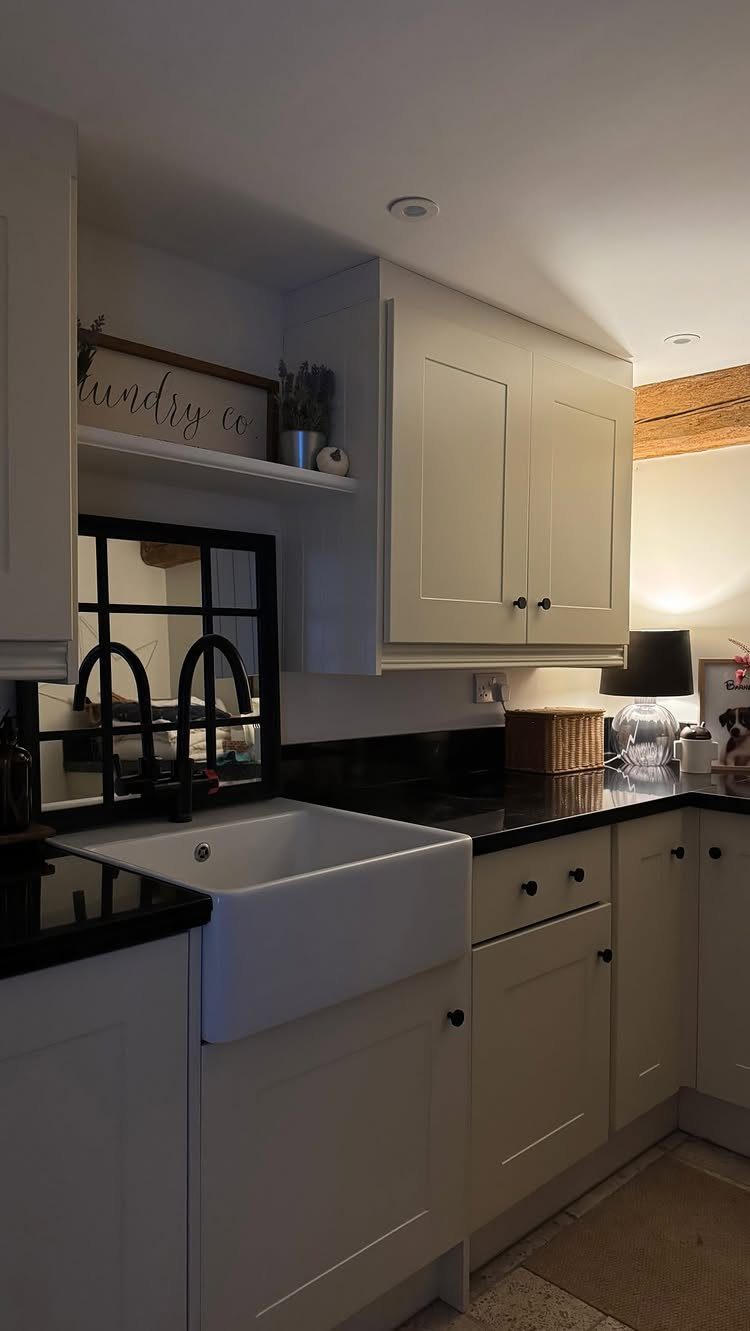
White cabinets with black countertops and fixtures give a utility room its edge without a single bold paint color. The dark surfaces take the wear, and the white keeps a small room from closing in.
I like repeating the black in two or three small places, such as the faucet and a lamp, so the contrast looks planned. Any more than that and the room starts to feel busy.
3. Dedicated Cleaning Cupboard
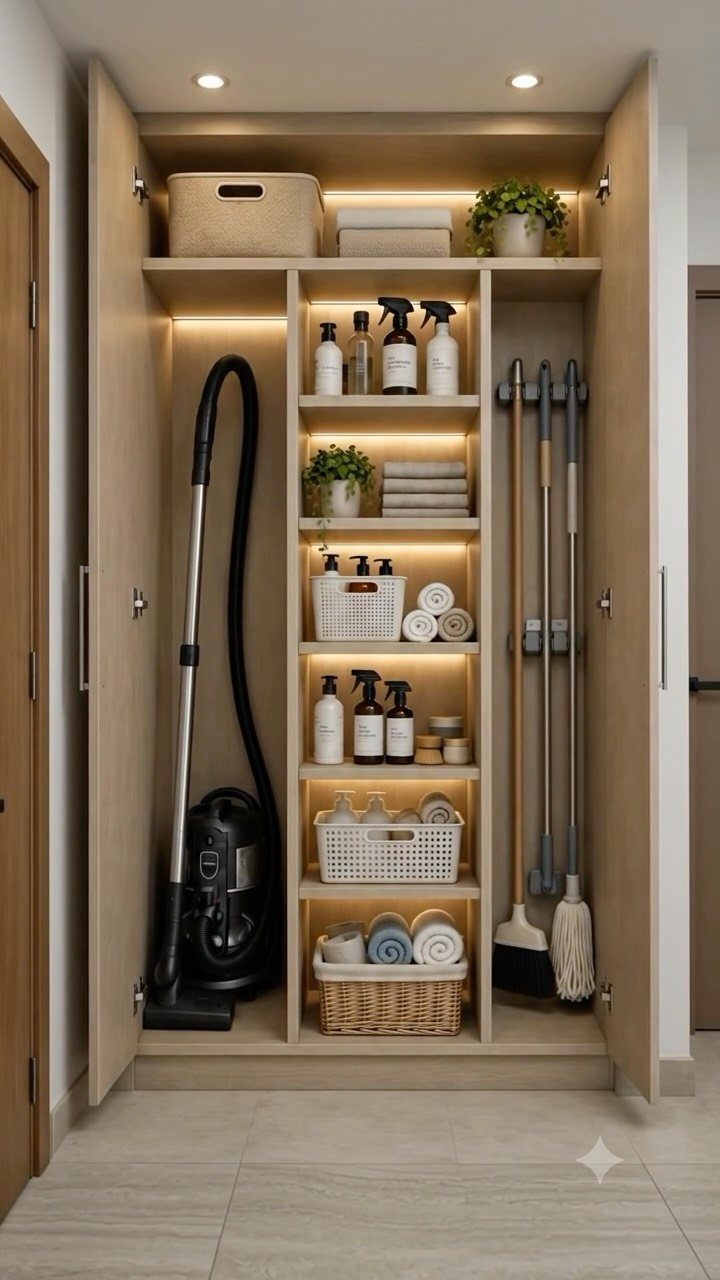
Give the vacuum, brooms and sprays one cupboard, and the rest of the house stops collecting them in corners. Tall items stand upright on one side, while shelves hold bottles and towels.
Light inside the cupboard is the upgrade I’d put first.
Dark cleaning closets get ignored, and a lit one gets used. Keep sprays on a shelf at a height you can reach without crouching.
4. Appliances Behind Cabinets
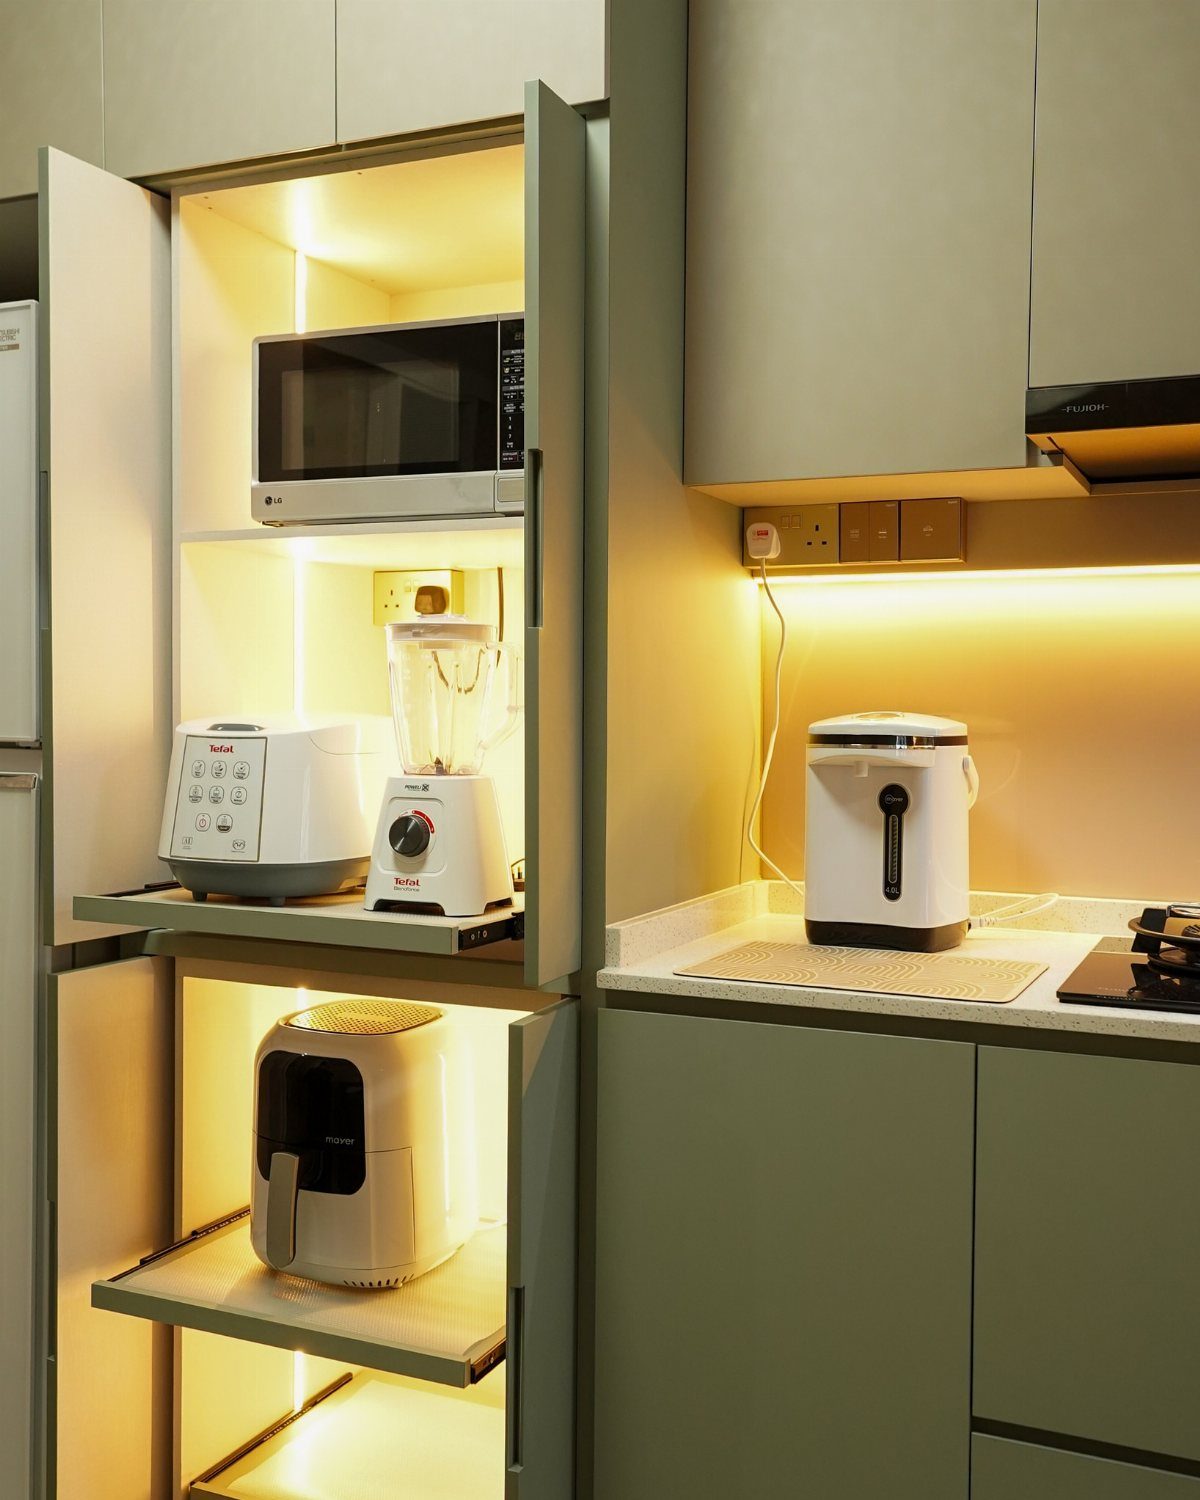
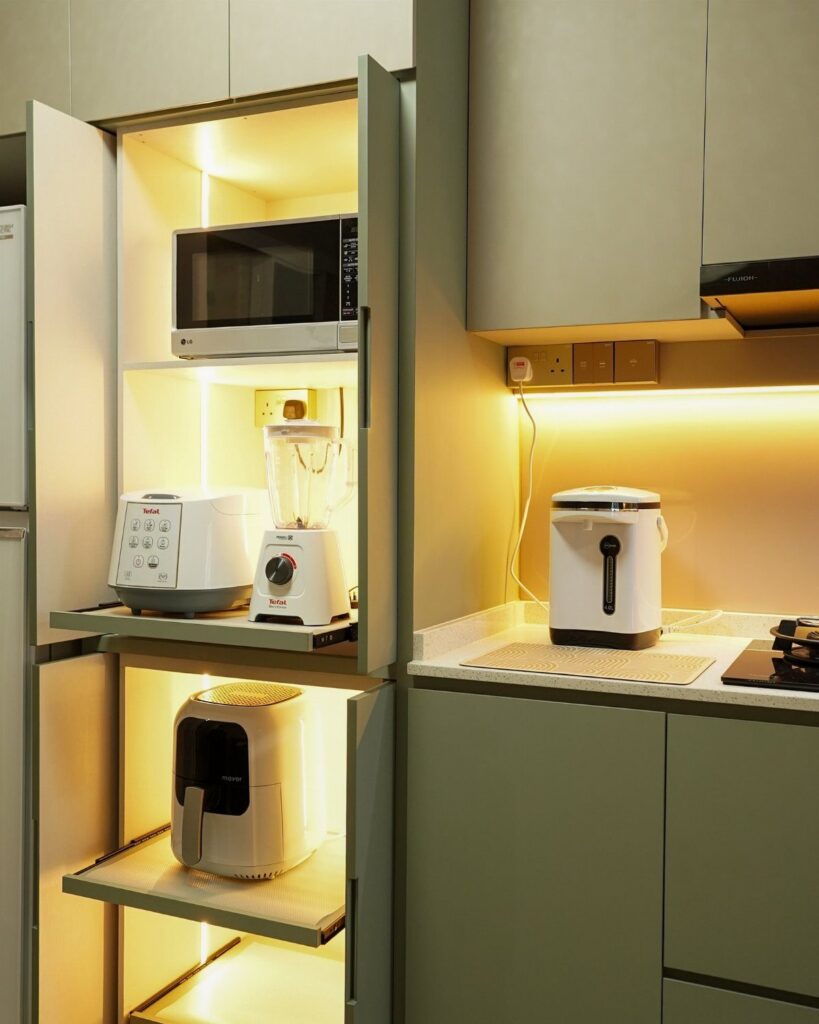
Closed doors let a microwave, blender and rice cooker disappear between uses, which frees counter space in a tight room.
A small battery puck light or LED strip inside the cabinet, placed at the front edge of the shelf, keeps the appliance controls and the supplies you reach for most easy to see without a flashlight.
Sage or olive cabinet paint keeps the whole wall calm.
One caution: leave the doors open while anything is running or hot. The counter is still the right spot for whatever you use daily.
5. Foldable Clothes Airer
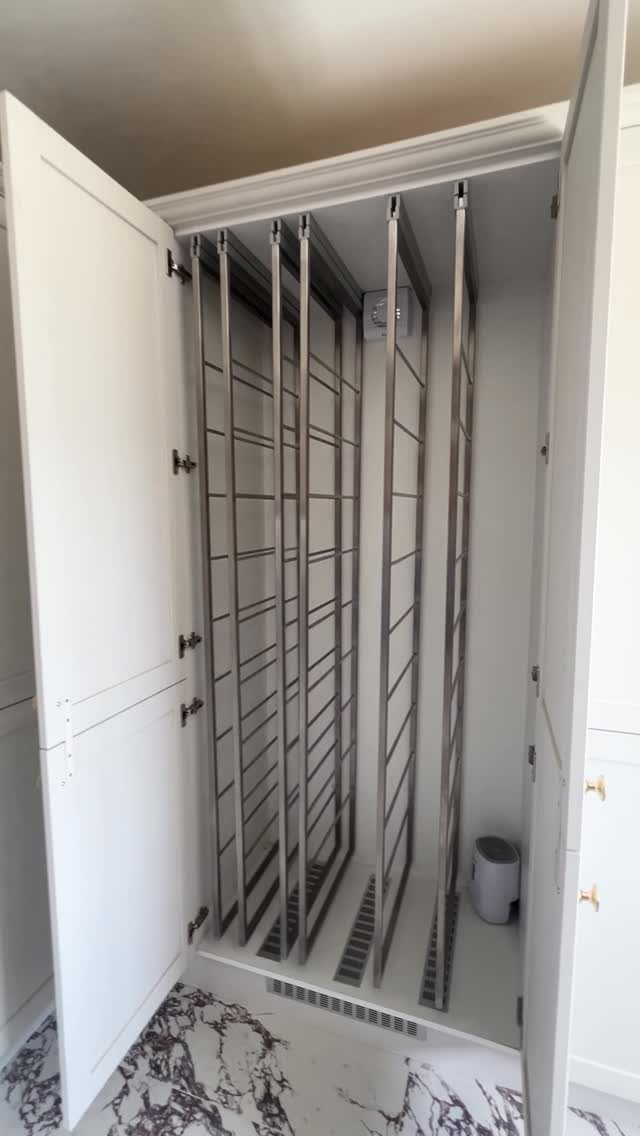
A foldable metal airer mounted inside a cupboard dries clothes out of sight, then folds flat and shuts behind white doors. Nothing stands in the middle of the floor for days.
I’d choose this over a freestanding rack in any room where floor space is short. Mount it where the arms can swing fully open, and check that wet laundry won’t drip onto a floor you care about.
6. Baskets and Boxes
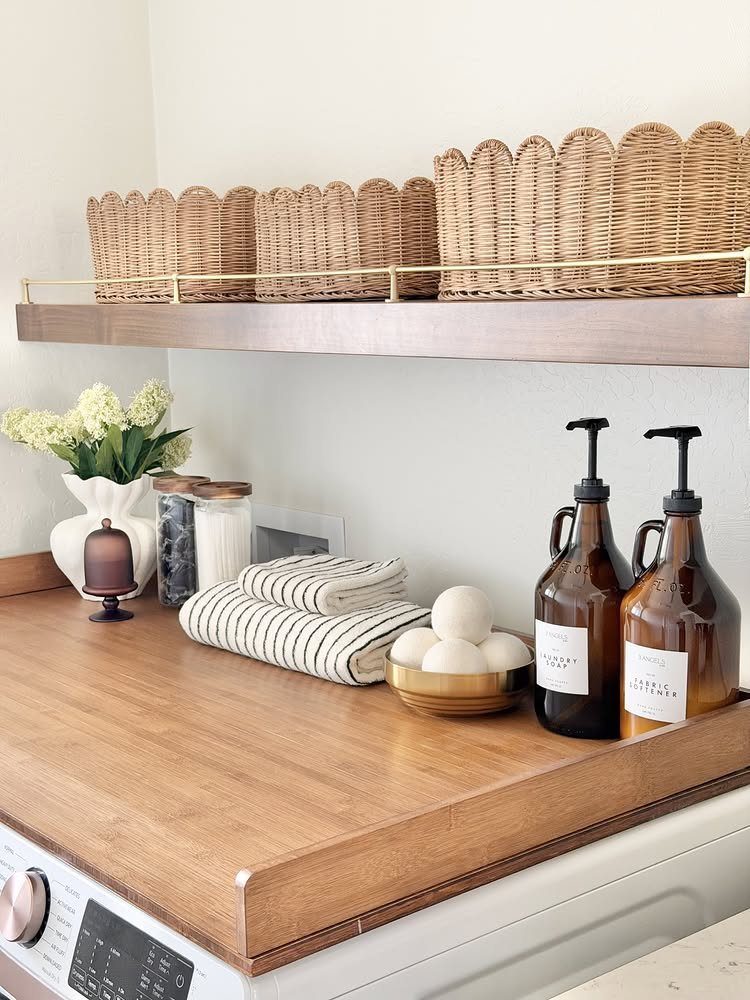
Woven baskets on a shelf above the counter hide the clutter and look good doing it. Use one for towels, one for small items like dryer balls, and one for whatever else keeps drifting onto the counter.
Label the baskets if more than one person does the laundry, or everything ends up in the wrong one.
7. Built-in Nook with Hanging Rail
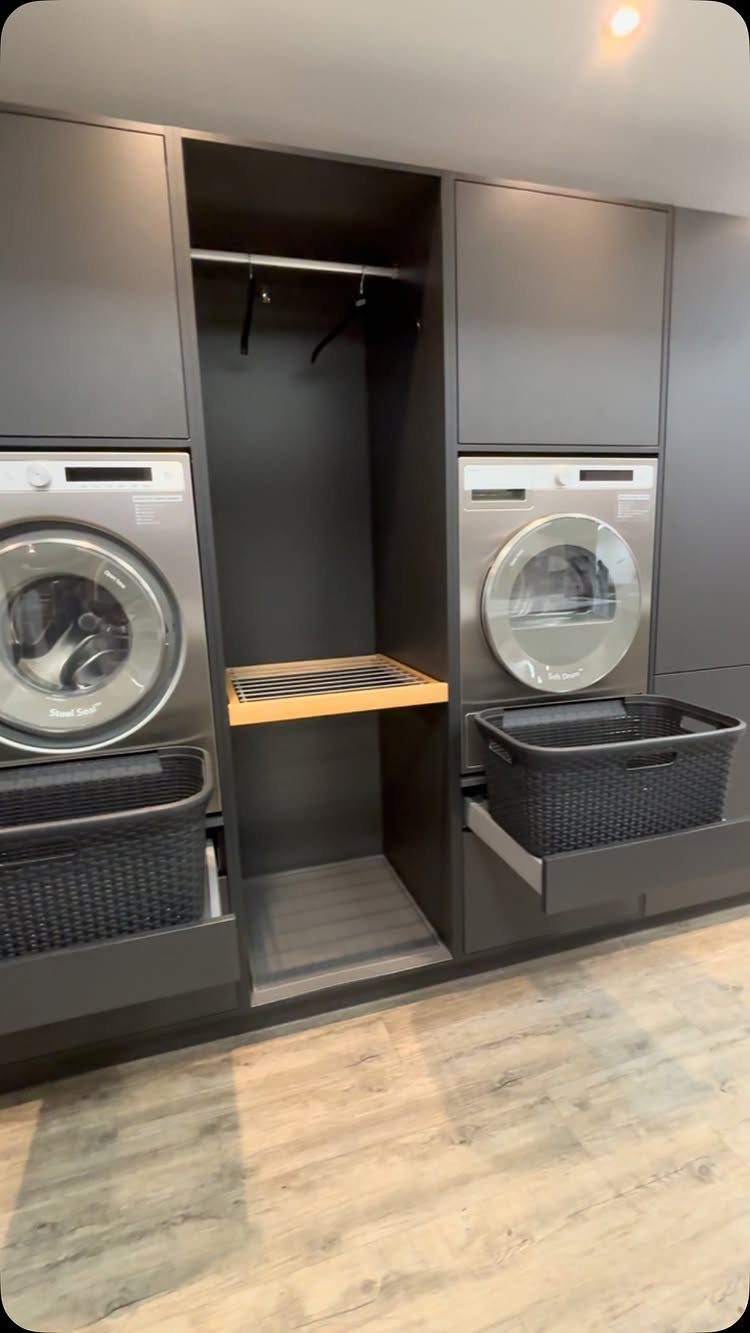
A hanging rail set into a nook between the appliances and cabinets gives drip-dry shirts and freshly ironed pieces a place to hang the moment they leave the machine.
Put a wooden shelf at the top for what you reach for most, and slide baskets underneath so the floor space below it does some work.
I like this layout because the rail sits right beside the washer and dryer, so nothing travels across the house damp. Leave enough open height under the rail that a shirt can hang its whole length without brushing the baskets.
8. Integrated Bench with Drawer Storage
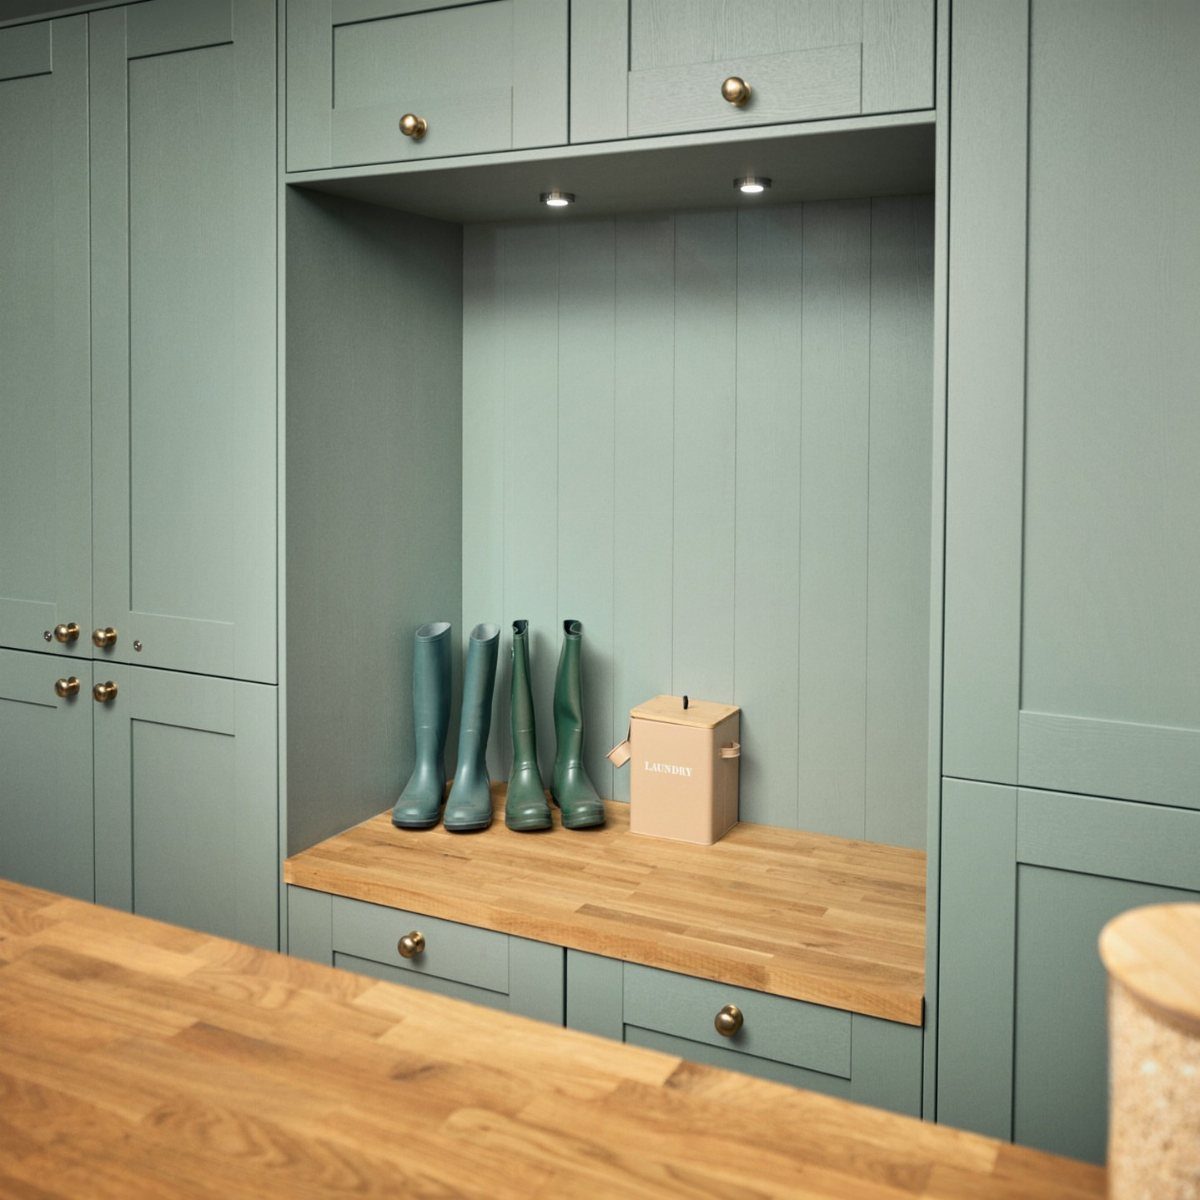
Boots and a laundry box need a landing spot by the door, and a built-in bench with drawers underneath gives them one.
Shoes and wet-weather gear go in the drawers, and the seat gives you somewhere to sit while you pull them on.
I’d pick drawers over open cubbies for a mixed household, since they hide the clutter that piles up near an entry.
Wall cabinets above the bench add a second tier for things you use less often. A box labeled for laundry on the seat keeps a load ready to carry.
9. Countertop Over Under-counter Appliances
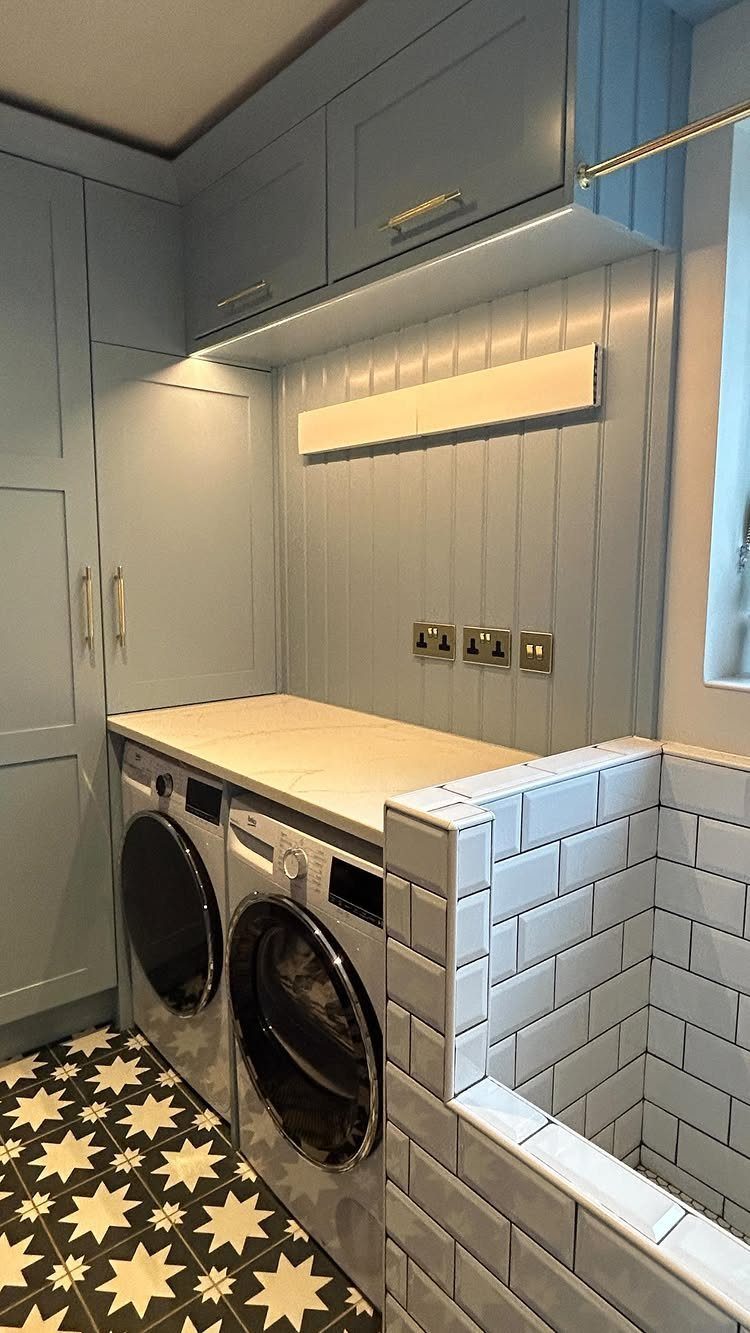
A single continuous worktop over the washer and dryer turns two bulky appliances into one clean run of counter. A countertop gives you a flat spot to fold and sort laundry, and the machines disappear under it.
I prefer this to a stacked pair when the room is wide enough, because nothing needs lifting to reach a high dryer door.
A white top keeps a colored room like this one light, and a patterned floor adds interest without any extra cost in storage. Measure the washer and dryer first, then order the top, and leave a little clearance behind them.
10. Floor-to-ceiling Built-in Storage Cabinets
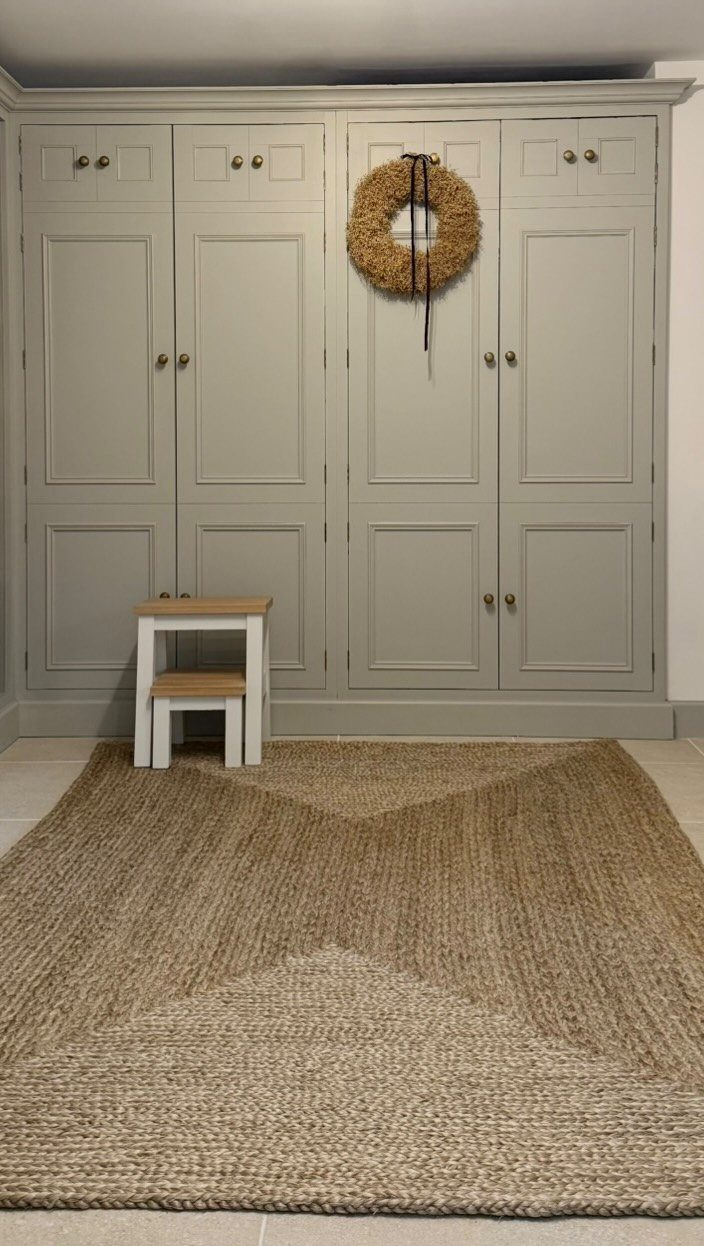
A full wall of floor-to-ceiling cabinets is the most storage a utility room can hold, because it uses the height that shelves and baskets usually leave empty.
Tall doors hide the mops, bulk detergent and spare linens in one tidy front.
I’d keep a small step stool nearby for the top shelves, and store seasonal items up there where you rarely reach.
Matching knobs, like the gold ones here, make the run look custom. Doors keep dust off everything inside, which open shelving can’t do.
Importance of Good Lighting
For lighting a worktop on a small budget, under-cabinet LED strips are hard to beat, because the glow lands right where you sort and fold.
Mount them toward the front edge of the cabinet bottom so your hands don’t shade the surface.
Open shelving gets a different treatment: small spotlights above it pick out baskets and make a practical wall look planned. Downlighters over a folding counter do the same job on a larger scale.
Plan the lighting before you pick paint or hardware. Wiring and strip placement are much easier to fix on paper than behind finished walls.
Create a stylish display by removing top-heavy cabinets and installing open shelving instead. This will make the space feel lighter and more spacious, and you can keep the essentials close at hand.
Choosing Durable Materials
Utility rooms see damp clothes, muddy boots and splashes, so spend where water lands. For cabinet doors, painted timber or laminate both hold up and wipe clean.
Ex-display kitchen cabinets can work in a laundry room, but I’d test how well the boards resist moisture and whether the finish holds up to steam before you commit.
For worktops, quartz, solid surface and laminate all cope with spills and scrapes.
Stainless steel beside the sink is nearly impossible to wreck, and it brings a plain, workshop feel. Stone adds weight to the room if the budget stretches.
Pick flooring that shrugs off water and wipes clean easily, such as LVT, porcelain tile or sealed stone. A runner you can toss in the wash warms up the floor and softens the room’s hard edges.
Ergonomic Design Considerations
Build the layout around the washer and dryer first, side by side or stacked, then place everything else by how you move through a load.
Leave elbow room at the sink so handwashing and rinsing muddy shoes don’t mean twisting around a corner.
Raising the washer onto a sturdy base off the floor saves your back, since you no longer bend to load or unload it.
Underneath, a pull-out shelf for the laundry basket turns that gap into a spot you will actually use.
In a narrow galley room, keep tall storage on one wall and lighter open shelving on the other.
Frequently Asked Questions
What are some ideas for a very small laundry room?
Go vertical and fold things away.
In a tiny laundry space, a folding metal drying rack mounted inside a cabinet keeps wet clothes hidden and tucks flat when you shut the doors, while stacking the dryer on the washer gives back floor you can actually use.
What not to store in the laundry room?
Keep unsealed food and anything that can attract pests out of the laundry room.
Damp clothes, splashes and steam also make the room hard on some items, so store only things that handle moisture, like cleaning sprays, detergent, towels and spare linens, and keep the rest elsewhere.
What are the primary functions of a utility room?
A utility room mainly handles laundry, cleaning supply storage and household chores.
It holds the washer and dryer, plus a sink for soaking clothes or rinsing muddy shoes. It also keeps messy, noisy items out of the main living spaces.